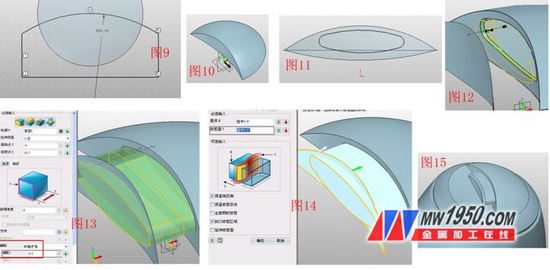
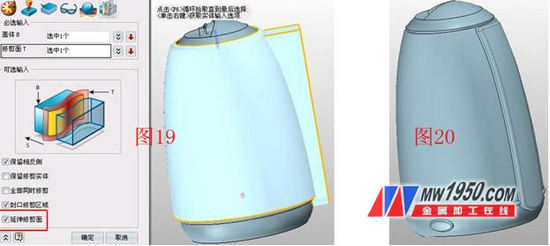
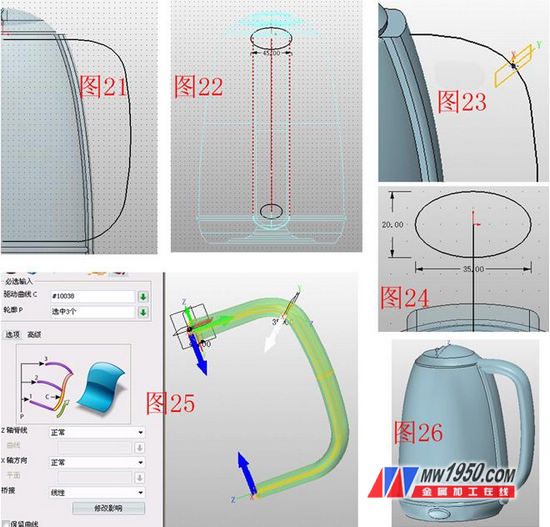
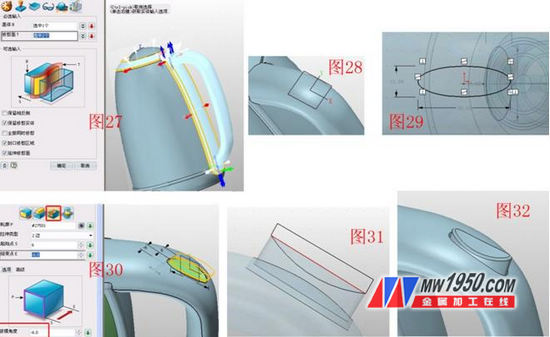
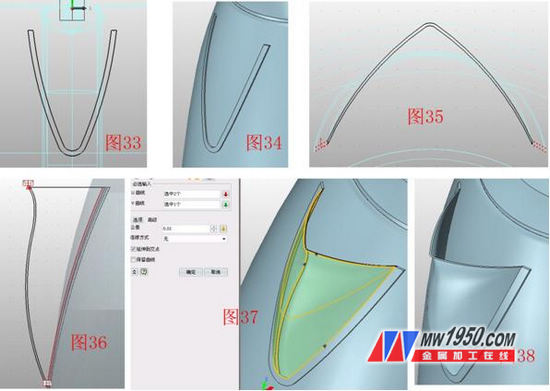
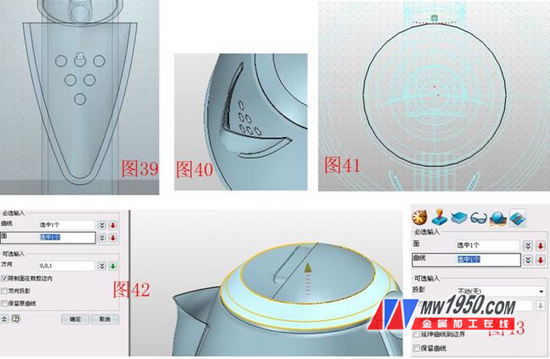
The ability of 3D CAD surface design greatly reflects the level of 3D modeling, and it is also a difficult point for many beginners to learn to learn 3D CAD modeling. Therefore, the 3D CAD modeling tutorial in June case, Xiaobian will take the electric kettle as an example, to share with you the small design of the surface design. The software is still dominated by Zhongwang 3D, because its original hybrid modeling is more flexible in terms of physical and surface interaction than other software , and it can be used faster for beginners. In this case, the 3D CAD modeling of the spout and the lid is somewhat difficult, and it is also the focus of today's study. Next, we will share it with you in steps. In the first step, insert the sketch 1 on the XZ plane and draw the graph shown in Figure 1. As long as it is roughly the same, you don't need accurate data, just pay attention to the surface where the lid and the body are in contact with the XY surface. That is, on the abscissa in the sketch. Exit the sketch and click Rotate to rotate the sketch around the Z axis, as shown in Figure 2. Click on the stretch and select the edge of the center circle at the bottom of the pot to stretch. The parameters are shown in Figure 3. Pay attention to the selection of the offset data. Create a cylindrical column in the same way, then click on the cylindrical tool to draw the cylinder at the center, as shown in Figure 4. The second step, click on the shape - split, select the pot body, the split surface is XY surface, so that the pot body and the lid are divided into two separate parts as shown in Figure 5, the pot body is hidden, and the pot lid is edited separately. Insert sketch 2 on the XZ plane and draw the arc as shown in Figure 6. Note that the lowest point of the arc is on the Y-axis. Rotate the arc with a rotary tool to form a curved surface, as shown in Figure 7. The curved surface is divided into two parts, as shown in Figure 8. The third step: hide the lower half of the lid, insert sketch 3 in XY, draw the graph shown in Figure 9, pay attention to the midpoint of the arc at the origin position, click the stretch - subtract operation, stretch the sketch effect as shown 10, this model is shelled, the thickness is -1. Click on the surface - face offset to offset the crescent-shaped section by 12. Insert the XZ plane as sketch 4, draw the graph shown in Figure 11, and after exiting the sketch, cut it with the subtraction of the stretch, as shown in Figure 12. Note the check before "retaining the contour". Click on Stretch - Base, stretch Sketch 4, and remove the hook before the "Retained Outline". The parameters are shown in Figure 13. Click the trimming tool, the base is the stretched body, and the trimming surface is the offset surface. Pay attention to the selection of the partial direction and round the edges. The effect is shown in Figure 15. Step 4: Insert the sketch 5 on the XZ plane, draw the graph shown in Figure 16, and extrude and stretch. The effect is shown in Figure 17. Click on the shape - trim, the base is the stretched shape, the trimming surface is the side of the kettle body, so that only the outer part of the shape is retained, as shown in Figure 18. Click on the surface - face offset to offset the outer surface of the pot outward by 5, and then use this offset surface to trim the shape again, as shown in Figure 19, rounded at the edges. Note that the parameter settings for the two trims are different. Use the same method to make the shape of the power indicator, as shown in Figure 20. In the fifth step, the sketch 6 is inserted in the YZ plane, and the curve shown in Fig. 21 is drawn. The two sections of the curve are on the Y-axis, and the sketch 7 is inserted in the XZ plane, and the two ellipse shown in Fig. 22 is drawn, and the center of the ellipse is in reference. At the two end points of the line, the reference plane is inserted at the position of Fig. 23, and the sketch 8 is inserted on this plane, and the ellipse shown in Fig. 24 is drawn. Click the drive curve to stake out, the drive line is sketch 6, the outline is the three ellipse of sketch 7, 8 respectively. Note that when selecting the contour, the filter should be set to "curve", so you can select the ellipse one by one, pay attention to the direction. As shown in Fig. 25, the effect diagram is shown in Fig. 26. In the sixth step, according to the trimming method of step 4, the handle is trimmed with the trimming surface shown in FIG. The reference plane is inserted at the position shown in Fig. 28, and the sketch 9 is inserted on this plane, and the ellipse shown in Fig. 29 is drawn. Click Stretch - Subtract and subtract a portion from the handle, as shown in Figure 30. Note the option to "Keep Outline". Click Stretch - Base, Extend Sketch 9, the parameters are shown in Figure 30, and the "Retained Outline" is canceled. Insert the sketch 10 on the YZ plane, draw the graph shown in Figure 31, click the subtraction of the stretch, remove the extra part of the button and round it. Click Move - Dynamically move, adjust the angle and position of the button, the effect is shown in Figure 32. In the seventh step, the sketch 11 is inserted into the XZ plane, and the graph shown in Fig. 33 is drawn. The V-shape is formed according to the stretching and trimming method of step 4, and the thickness of the shape is 0.8, as shown in Fig. 34. Insert the sketch 12 in the top plane of the V-shape, draw the graph shown in Figure 35, and pay attention to the selection of the reference line. The sketch 13 is inserted in the YZ plane, and the graph shown in Fig. 36 is drawn. Click on the curve - U / V surface, U, V curve is selected as shown in Figure 37, forming the outer surface of the spout, using the same method to make the inner surface of the spout, click on the N-sided surface. Repair the top surface of the spout, the effect is shown in Figure 38. In the eighth step, insert the sketch 14 in the XZ, draw several circles on the surface, and stretch and subtract to form a water hole, as shown in Figures 39 and 40. Insert the sketch 15 on the XY plane and draw the circle as shown in Figure 41, taking care to be tangent to the reference line. Click on the wireframe - projection curve, project the sketch 15 along the direction of the Z axis on the surface shown in Figure 42, click on the surface - curve segmentation, and use the projection curve to divide the face into two faces. 43. This step is for the convenience of coloring the model. After the model is finished, click on the visual style-surface property to color the model, and the three-dimensional modeling of the electric water heater is completed. Today's surface modeling tutorial, I hope everyone can practice more, in order to make their 3D CAD modeling level to a higher level! You can come to Zhongwang 3D official website to download 3D2013 (), familiar with the operation of hybrid modeling in the interaction between solid and surface, and now also provide free 3D CAD drawing download of electric kettle. The monthly training of Zhongwang 3D Technology Exchange Forum can be downloaded: http://! The practice topic in July is energy-saving lamps. Welcome everyone to challenge! With spiralling energy costs accompanying the constant need to replace bulbs and tubes our 2 ranges of Marine Aquarium Lighting makes perfect sense.A conservative savings in electricity consumption of up to 50% can be achieved over metal halides and 25% onT5 Fluorescents.
Aquarium Led lighting
2 Manual dimmers for White, Blue change the intensity of lighting
Simulates the sunset and sunrise
55pcs 3w leds offer lighting to tank effectively
Adjustable kits, detachable cords
Philizon Lighting is dedicated to provide high quality and durable lighting product for customer with very competitive price.Our products mainly foucs on LED Grow Lights and LED Aquarium Light.The equipment and materials to produce hydroponics led Grow Light and marine Aquarium Led Light fixture imported from Taiwan, Japan, Korea and Unites States, such as automatic SMT machine, reflowsoldering machine,all kinds of electric test equipment, large integrating sphere and such sorts of productionand R&D equipment.
Item Display
Key Features
1.The lifespan is over 50000 hours,low maintenance costs.
2.Energy conservation,saving over 80% energy than the traditional HPS.
3.High light efficiency,90% of the light will be absorbed by the aquatic plants,while just 8%-10% to the HPS.
4.Build-in cooling system,could solve the heat dissipation excellently.
5.Built-in power supply, CE approved, No setup required, just simpler and safer plugs directly into AC85V-264V, no reflector & ballast needed.
Package Include
1 X LED Aquarium Light
1 X Free Hanging Kit
1X Free Power Cord
All the lamps have passed strict quality examination and are packed carefully before shipping.In order that our customers get high quality lamps,we attach importance to every details.
Application
1. coral reef lighting,fish tank lighting,coral reef tank lighting
2. aquarium lighting,aquarium art,aquarium shop,aquarim centre
3. fish bowl lighting,fish lighting,freshwater lighting,saltwater lighting
Our LED Plant Grow Light and led aquarium lamp are popular in led market,cause its elegant outlook and its high quality and competitive price.We are eager to kick off cooperation with you, our valuable customers. Let`s work together and save the energy.
Warmly welcome to visit Philizon in Shenzhen China.
Marine Aquarium Lighting,Marine Led Aquarium Lighting,Marine Led Lighting,Marine Aquarium Led Lighting Shenzhen Phlizon Technology Co.,Ltd. , https://www.szledaquariumlight.com